Showing posts with label improv. Show all posts

Wednesday, June 10, 2015

Gemstone Beginnings : :

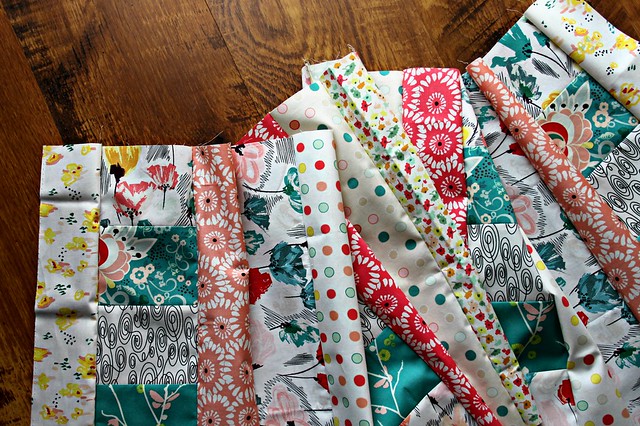
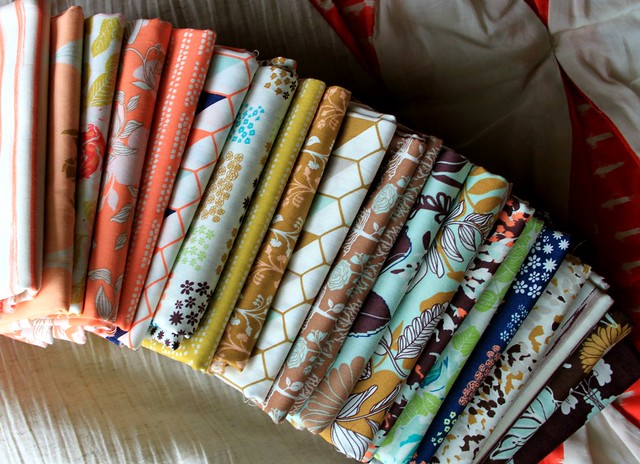
Today's my Birthday, hooray! But I wanted to pop in quickly and share what I started yesterday! I've had this idea to make improvisational gemstone quilt blocks for so long now. Sketching out various diamond and gemstone shapes has become habit for me whenever I sit down with a pen and paper. When these Cultivate fabrics recently arrived, even after I shared yesterday morning's post, I didn't think these prints were the right match to my gemstones quilt idea.

Cultivate by Bonnie Christine

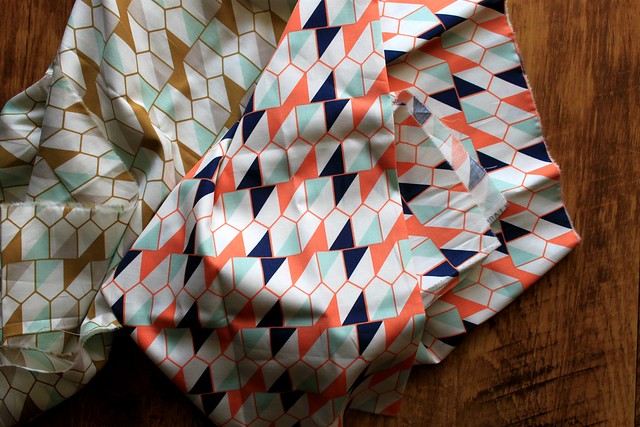
Then yesterday afternoon I took another look, and noticed the inconspicuous diamond shapes within these two Cultivate Seed Packet geometric prints. I was inspired to try!

Seed Packet Geometrics

The first block came together a bit slow. I was improvising, composing my block without any pattern or prepared cut pieces of fabric. When I first dreamed up this idea, I was planning to happily accept a bit of wonkiness, unmatched seams, etc... But as I worked on my first block I was being a bit too careful for me to not lose interest before making enough blocks to finish as a quilt.

Improv Gemstone block No. 1! ✨💎 #gemstonesquilt

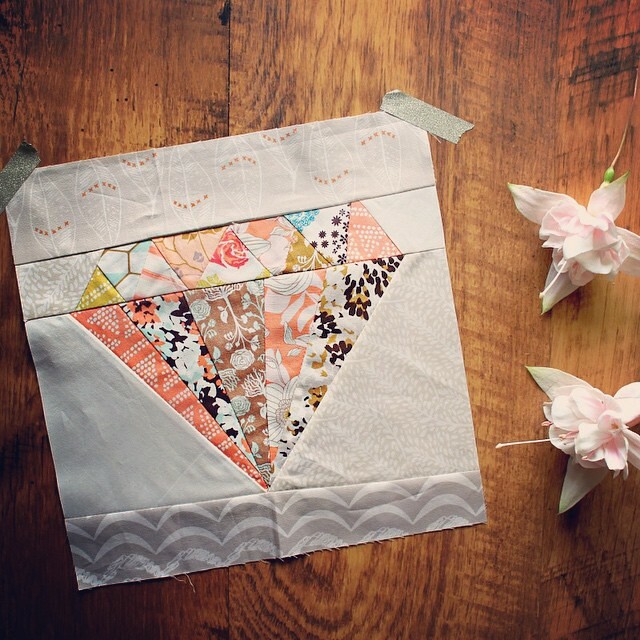
The next two came together in the same amount of time it took me to make the first. They're certainly more wonky than my first try, but I love how they turned out! I especially love how the three look together!

These #gemstonesquilt blocks are so addictive! Today's my 34th Bday, it's going to be a busy, special day, but not too busy that I can't squeeze in a few more of these! 💎💎💎 #CultivateFabric #improv

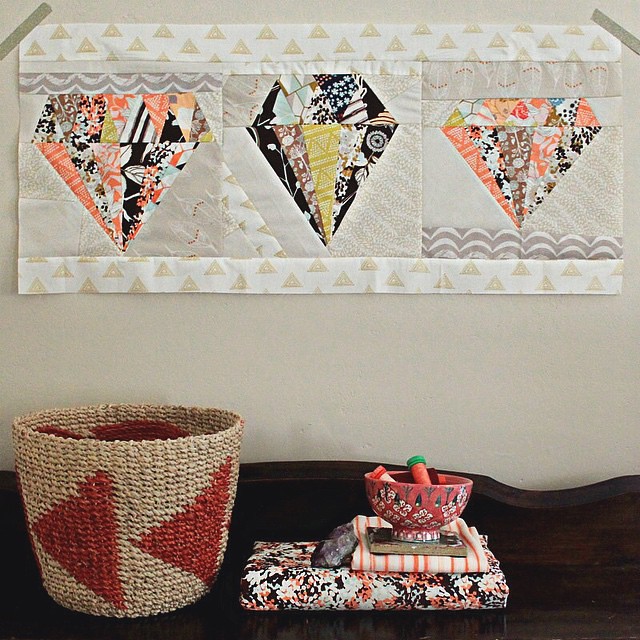
The three 10" square blocks sewn together, with a long narrow strip added to both the top and bottom, finish at just the right size to turn into a new pillow in my new favorite 14" x 28" size. I'm considering it for just these three, there will surely be many more gemstones in my future! Hmn, what do you think?

♡ Maureen

Monday, March 31, 2014

Thoughts on Improv : :

After spending most of March working on both my Winter's Garden and Winter Herringbone quilts to finish in planning with my week of giveaways this last week, it's now time for me to begin some new projects and to revisit some waiting to be finished!

Rapture Quilt progress!

My Rapture quilt is next in line to complete! It began as a second "Making Rows" quilt idea that has changed quite a bit from my original sketch. I so love having the freedom to dream up my pattern as I go without restraint. It's how I work best! Improvisational is the style of quilting that I most enjoy, that feels the most natural & creative to me personally, and is where I'm most comfortable within the quilting genre.

Rapture Quilt Making

I've been thinking about my approach to quilting so much lately, especially since the request for me to release a pattern or kit for each new quilt I finish has become so common. My unplanned way of making most of the quilts I do is the reason you haven't seen me release many quilt patterns these last two years. Surely that's the downside, the not being able to share more how-to's and offering patterns for sale. If I'm being open and honest today I do need to share, my hope is that even though I don't offer many chances for you to make the same quilts I make, that my creativity, my enthusiasm for producing unique quilts, for photography, and for my love of beautiful fabrics might inspire you to be more adventurous in your own artistry.

Today I would love a little feedback! What would you like to see? More pattern releases, tutorials, more of the same?

And how about you, how do you feel about Improv quilting?

Monday, January 6, 2014

A Marvel Comics Quilt : :

A Marvel Comic Quilt

This Marvel Comics Quilt marks my last completed quilt of this past year! I made it from start to finish in about ten hours, beginning one night after dinner, working until late, wrapping it up the next day by early afternoon. I actually finished just in time to gift it to it's recipient, my nephew Ben, on the night I gave out all the quilts! Phew!

It's made using my go-to quilt as you go method and is improv pieced in a similar way to how I assembled both Owen's Ant Farm & Jacob's Stitched Typography quilts. Most of the Marvel Comic prints I ordered online and the rest of the fabrics are blenders from my stash. This is definitely one of those quilts that's so fun to look at up close, especially if you're a comic book fan!

Fun!

At first the quilt front was pieced together without the black solid, but I decided it really needed the break from all the busy happening with the superhero patchwork front and the comic book cover backing!

Superhero Patchwork

The Marvel Comics Comic Lineup print I found for the back was the big favorite overall and it also had the best feel, which is so important to me! Sometimes these licensed novelty fabrics look really great but they lack a little on quality, but not this one!

Marvel Comic Quilt Back

I chose a bright medium blue stripe for the binding. This perfect stripe is the Hello Pilgrim Stripe in Blue by the very awesome Lizzy House. I really love stripey binding!

Stripey Binding

Now that I've shared my last finished quilt and before I begin a new year of quilt making, I do want to look back one last time at all the quilts I made in 2013. I grew so much as a quilter, and I think the best way to see how much is for me to write one last post, sharing all of them in one place. Hopefully you're up for it!

Maureen

Monday, August 19, 2013

An Ant Farm Quilt : :

Ant Farm Quilt -- qayg
Last week, on our way out to have dinner at my parents house, we took a drive to take these photos of my finished Ant Farm Quilt, a request & gift for my Nephew Owen. Since we couldn't think of a "hill" to take these photos in front of, we decided to take them at the very top of the prettiest hill around, Dutch Hill. It was windy and the sun was just starting to set, but it was so pretty! You may have already seen the video I shared here on my Instagram, it was a beautiful evening in Potter County!

This quilt came together super quickly, once I finally decided on a pattern! It's made up of scrappy, improv log cabin blocks on both sides, separating the colorful fabrics from the lighter, white, & grays that I used. For the center of the quilt I made four courthouse step blocks, keeping that same color separation. I really love the combination of these two quilt blocks, and have a second quilt all planned out using them once again!

Ant Farm Quilt -- qayg

It's quilted using my quilt as you go method, with a gray Aurifil 50wt and straight line quilt stitches spaced about an inch or so apart. In this photo below, with the sun facing the finished quilt, you can really see all those pretty quilt stitches!

Ant Farm Quilt -- qayg

One of my favorite things about finished qayg quilts is having that contrast of a heavier, more densely quilted quilt for the front, with the softer, square grid pattern for the quilt back.

Ant Farm Quilt Back -- qayg

Since I made my blocks for this quilt rather large, at an 18" square, I added a simple tie with a pale gray cotton floss to the center of each block, as well.

Ant Farm Quilt -- qayg & center tied

For the binding I chose a Lizzy House striped fabric from her Hello Pilgrim collection. I love using a small scale striped fabric for binding! The colors in this one worked perfectly with the Backyard Baby fabrics!

Ant Farm Quilt Binding -- Lizzy House Stripe

Here's that extension table binding trick once again! 

Ant Farm Quilt -- binding

Ant Farm Quilt -- binding
Along with the Backyard Baby prints I used lots of Riley Blake Basics -- their Cotton Dots, Solids, & Ombre Dots. I really put my overflowing scrap drawer to good use on this quilt, as well. That always feels so good!!

Ant Farm Quilt -- qayg

Ant Farm Quilt -- qayg
I'm tucking this quilt away with the others I've made and are making for my children, nieces, and nephews. I'm hoping to see that pile grow by seven more between now and Christmas! I've already made lots of progress on my Butterfly Quilt -- more on that one soon!!

Happy Monday, friends!     Maureen

Monday, March 11, 2013

A Quilted Improv Chevron Pillow : :

Improv Chevron Quilted Block

It's been a while since I shared a new pillow here! This one is made up of an Improv Chevron block, a tutorial by Six White Horse's, in a favorite color combo of mine -- yellow, aqua, grey, navy, teal, white, and a little brown. It's for our Living Room, which I've been trying so hard to keep within this color scheme!

Quilted Improv Chevron Pillow

This quilt block pattern is such a favorite of mine! I made a couple several months ago for a charity bee quilt, and right away made a third, they are so much fun! And, I'm definitely not done with this block pattern yet. A quilt in this style, and even in this same color palette, would be so perfect for one of my sisters!

Improv Chevron Block

The back is finished in an Essex Yarn Dyed RK linen in Leather and some pretty Aurifil thread in Light Blue. The perfect combo to keep the earthy feel I'm trying to maintain in this room, which is for my husband mostly since that's his style all the way!

Heirloom Stitch in Aurifil Light Blue

While finishing the envelope style back, I had some fun trying out a new stitch on my Janome Horizon, one of it's many Heirloom stitch options. It's a simple diamond pattern with a heavy double stitch. I love the way it looks and I can't way to try out more on a second pillow. Next, I think I might try to make some sort of embroidered sampler pillow, in the same thread colors as this pillow, full of the Heirloom stitches.

Heirloom Stitch. Light Blue Aurifil. Essex Yarn Dyed in Leather.

I'm really loving it next to my favorite Anthropologie lampshade, and I'm so glad it's finally finished!!

Improv Chevron Pillow

Happy Monday!   Maureen

Tuesday, March 5, 2013

More Carnaby QAYG : :

This is where I'm at this morning with my Carnaby St. QAYG project! The brightness of this fun quilt is off the charts for sure!!

Carnaby QAYG

Today I have lots to do, mostly crown orders, so it isn't likely that I'll be making anymore progress. But before I move onto those things, since so many of you asked for me to share a little of the process on this one, I wanted to do that quickly!

I explained within the comments here and on fb yesterday, that the center is made up of several Carnaby St and PE solids that I cut using my Dresden ruler, pieced together, and then appliqued to the Emerald solid fabric. Next, I added the floral fabric to the top and bottom of my center piece, after I had quilted two long pieces of it to some batting scraps with simple long straight-line stitches.

After measuring the long side of my center piece, which was about 30", I made up three improv style blocks, each measuring 10.5" quilted, to go on both sides. I took this photo after dark last night, just before I added those quilted, improv pieces to the sides, so it's not the best! But I wanted you to see these pieces laid out, before I sewed them together.

just before adding the Improv blocks

I used my same QAYG method for this, sewed those blocks together, and added them to the sides of my center! Easy!!

after adding the Improv Blocks

My quilting is very free, improv, and fun! I think the orange Aurifil thread and random, straight-line quilting goes really well the style I have in mind for this quilt.

Psychedelic QAYG with orange Aurifil

I'm always amazed to see how an image taken one day...

Carnaby Street and Pure Element Solids

Can be transformed into something like this, the next!

Carnaby Vibrations Center & Improv QAYG

I can't wait to find more time for this quilt! And, I hope I explained just how simple it has all come together so far! If you have any questions, just leave them in the comments for me and I'll be sure to get back to you!!  
Maureen

Monday, February 25, 2013

A Chicopee Triangle & Colorblock Quilt : :

Chicopee Triangle & Colorblock Quilt

I finished another new quilt this weekend, A Chicopee Triangles & Colorblock Quilt! Many thanks to those of you offered up sashing help on Thursday!! I was working on finishing up my triangle blocks, stopping to read your suggestions as they came in, agreed that the white had to go, and then I had to do some thinking. I was really torn between the Chicopee & grey and the Chicopee & aqua, yellow combo for a little while.

Color Blocking + Chicopee

I loved the way the grey warmed up this collection and kept it a little masculine, but equally loved how the two solid colors brightened everything up. Curious, I decided to see how things would look if I added even more colors to the mix, with the grey as well, and I loved it!!

Chicopee Triangles Quilt Top

Seeing all those Art Gallery Pure Elements beautifully blur together with the Chicopee colors made such a pretty picture!

a peek at my Chicopee!

The back is imporv pieced together using up some of my left over triangles, to make one large triangle, combined with several more Pure Element Solids. I snapped this photo early Saturday morning, I just love these colors together with the Chicopee patchwork! 

Chicopee Improv Quilt Back

I went with 505 Spray again for the basting, and quilted when I found the chance throughout the rest of the weekend, using a colorful, Brick Red Aurifil Thread.

Chicopee Quilted

I was pretty nervous about how my quilting would look on all those solid fabrics that made up the back, with such an obvious thread choice, but I went for it anyways!

Chicopee Improv Triangles --- the back of 
my Chicopee Triangles Quilt

My binding is made of Dark Citron Pure Element, my favorite shade of green!!

Dark Citron Binding

Chicopee Quilt Back

I wish I wouldn't have gotten better photos of the finished front, this is my best shot!

Chicopee Triangle & Colorblock Quilt

Thankfully the back photos turned out nice. I'm really happy I went with something modern and improv for the back!

Chicopee Triangle & Colorblock Quilt

This was a really fun quilt for me to make and is my husband's new favorite! It finished measuring 50" x 56", so a nice quilt size for the couch!

I have my Applique Art quilt top all basted and ready to be finished next, just as soon as I figure out a plan for the quilting!

Wishing you all a wonderful new weekMaureen 

Wednesday, February 6, 2013

An Improv & LillyBelle Quilt { A Quilt As You Go Finish } : :

Improv & LillyBelle QAYG finished quilt

I am so thrilled to have this quilt finished! To say that I took my time with it, is a HUGE understatement, and definitely shouldn't signify that creating it wasn't fun! I really enjoyed it and I'm so glad I took my time! I think it's honest to say that the main reason it did take until now is simply because I was making this quilt just for me, and you know how those things get pushed to the bottom of the list!

Well, since sharing my Quilt As You Go How-to, I've received so many questions on finishing a qayg quilt! I took lots of photos as I finished, to share today and link to as a Part 2 of that tutorial. My intention was to make the finishing of this quilt as easy as possible and I think it was!

For starters, I used 505 Basting Spray for the first time. That's the only part I didn't photograph. My husband helped with the spraying, I laid the quilt right side down, he sprayed the batting that was already quilted to the quilt top in smallish sections, and I made sure the seams were all nice and flat while I smoothed down the backing fabric. All in all it took maybe 20 minutes!

About a week later, I finally found the time to add my final quilting stitches. When adding this stitching it IS recommended that you do use a Walking Foot. I haven't found it necessary now that I am using my Janome. Working my way down from the top of my quilt to the bottom, with my stitch length set at 3, I simply sewed about 1/4" to maybe 1/2" from the seam line.

sewing along each side of the seam

scant quiting stitch

I continued this for both sides of each seam running from the top of my quilt to the bottom!

quilt both sides of the seams

Here's a good look at just how these stitches will look from the backside of your quilt!

quilted stitches from the back

Now working from side to side, I decided this time to add my stitches by stitching in the ditch. This is a way of quilting that minimizes how much thread shows on the top of the quilt. Even though stitching in the ditch is somewhat invisible on the top of the quilt, it does secure all three layers of the quilt sandwich!

from side to side -- stitch in the ditch

You can add your quilting stitches either way -- by stitching along the seams, by stitching in the ditch, or combining them as I did.  Any of these will be enough to set that backing fabric to your quilt as you go quilt top!

Here's a look at how those stitches will look from the back of your quilt, once you're completely finished!

quilted stitches -- back

But first, you have to bind the quilt using your preferred method! I know there are about a million ways to do so, my go-to is exactly the same as Allson's of Cluck, Cluck, Sews Machine Binding method! She has a wonderful tutorial!!

I also love using this super smart, time saving trick!

Add your binding

If you have a foot on your machine or extension table, the binding unrolls neatly and slowly, and out of your way, as you add it to your quilt. No need for pins -- LOVE it!!

Little Binding Trick

Seriously -- between the quilting as you go, the basting spray, and this little binding trick -- quilting doesn't get any easier folks!!

And, in the end you have a pretty, handmade quilt!!

back, binding. front

QAYG Quilt


Since this quilt is just for me, yay ! I went a little crazy with the super sweet and girly LillyBelle Garden Rocket border and used nothing but Bari J.'s Henna Stripe for the back! I love it!! It's so colorful and fun on the front and has such a Wintery back, and I do LOVE Winter!!

Wintry Back -- Henna Stripe & Aqua

In the end I think we'll all agree, regardless of your fabric taste or even how you make a quilt -- that this is the very best part!

Finished Last Night!!

I hope you do give qayg a try! Be sure to let me know if you do, ok? Feel free to share on my Facebook page or in my Maureen Cracknell Handmade Flickr group, and of course you can share a link here or email me anytime, as well!

Thanks so much for stopping by!!   ♥Maureen