Showing posts with label black and white. Show all posts

Friday, October 30, 2015

A Fabric & Book GIVEAWAY : :

It's Fabric Giveaway Friday!

Giveaway Collage


*  *  *  *  *  *  *  *  *  *  *  *  *  *  *  *  *  *
CVQW 184 X 92 thumbnail

Canton Village Quilt Works has been in business since 2000. They started as a long arm business. As they grew, they began design work, teaching, and selling fabric, kits, notions, and more online in 2009. Quilting is their passion and fabric inspires them. They want to bring to you the best quality and most gorgeous fabrics that the industry has to offer so that you can be inspired in that next project of yours. Education is a key part of CVQW. Passing along tutorials, podcasts, and traveling to teach and lecture helps them to continue inspiring all quilters alike. CVQW is a Judy Niemeyer Certified Shop (CS) and Jackie Kunkel, the owner, is a Certified Instructor (CI). At  CVQW they are continuing to learn to bring you only the best! They welcome all quilters to peruse their site and hope that their products will be in your next project... they would love to see what you have made!!

Website * Shop * Blog * Facebook * Podcast

* * * * * * * * * * * * * * * * * * * * * * * * * * * * * * * * * *

We hope you enjoy visiting Canton Village Quilt Works!!  

22754

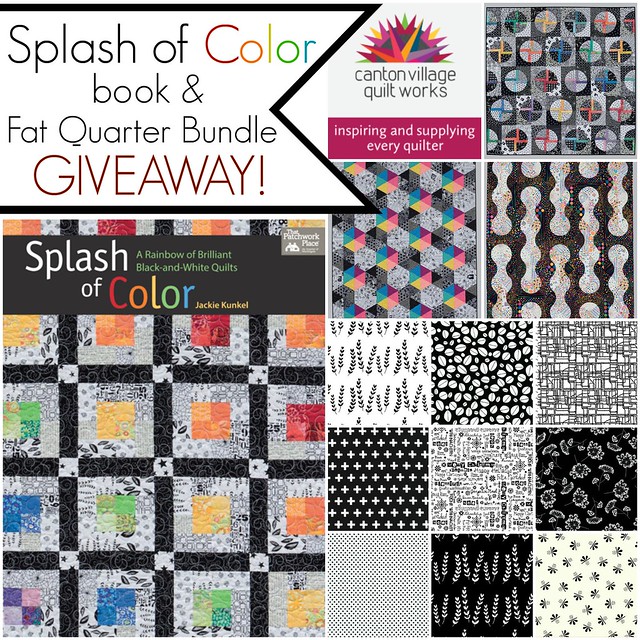
For this week's Giveaway, Jackie at Canton Village Quilt Works is offering a signed copy of her brand new book, Splash of Color and a Fat Quarter Bundle including eight Black & White fabrics from her wonderful shop!

Giveaway Collage
  
Enter to win! 

Here's how,

1. Simply leave a comment! (one entry)
2. Follow Canton Village Quilt Work's blog and facebook page! Just let me know that you do by making a separate comment here to record that entry. (one optional entry)
3. My followers get a third entry! Whether you follow me here, on Facebook, or Instagram. Just let me know that you do by making a separate comment here to record that entry. (one optional entry) 
4. Help spread the word!! I know that many of you already do, so I've add that as another way to enter! Whether by instagram, tweet, facebook, pin, blog, etc... (one optional entry)

The winner will be picked at random and I will announce their name at the bottom of this post, here on my blog!

* Note * This giveaway is open to EVERYONE! If you're a "no reply" or anonymous commenter, please remember to include your email address in your comment!


+ + + + + + + + + + + + + + + + +

Thanks to all who enter our Giveaway! This week's winner is comment #205, annemarie! Congratulations I will be in touch shortly! ♡ Maureen

Thursday, August 27, 2015

Last Night's Pillow Making : :

With the kids returning to school, comes the return of some regular daytime sewing hours for myself, and if I'm lucky, some after-bedtime sewing on occasion as well. Last night I treated myself to a little late night pillow making. Nothing fancy, just a quick fabric pull in a fun color scheme I've been brooding over. Black & whites + teal, mustardy yellow, blue, gray, & a rosy shade of pink, what's not to love!

Pillow Fabrics

It wasn't until I snapped this photo that I recognized the color similarity to Katarina Roccella's new Imprint collection. I'll have to add it to my must-stash list, I love the way these colors play together!

Scrappy pillows just make me happy, especially when they come together quick! I decided on a sawtooth-like design, sewing two strips together, a black & white print with one of the colorful fabrics, the same way I do when making quilt binding, piecing each strip with a diagonal seam. Once all the strips were sewn together, I staggered them to create a zig-zag pattern. A quilt in this style of block would be awesome!

Pillow Cover

For the very first time, I backed this pillow using an Art Gallery Fabrics voile. Voile has the most luxurious feel! I can't believe I haven't tried it before!

Voile Back

I finished my pillow with a Cultivate print binding leftover from my recent Arizona Herringbone Quilt. I love a striped binding and these peachy-coral colors are just perfect!

Pillow Binding

Pillow Cover

In went my pillow form and VOILA!

New Pillow

The first of many small items I hope to make and sell in my little Etsy shop!

♡ Maureen

Tuesday, November 19, 2013

A Stitched Typography Quilt Tutorial : :

A Stitched Typography Quilt Tutorial

I created this quilt for my son Jacob and wrote the tutorial to first share on the Janome Project Center here, as a Janome Independent Designer. It's a Quilt-As-You-Go style quilt, made with log cabin style blocks, including a simple and fun applique, and stitched typography created using the built-in text stitches in the Horizon Memory Craft sewing machines! This is definitely my most favorite style of quilting!

Janome Supplies Required : :

Fabric and Materials Required : :
  • a variety of fabrics cut into fat quarters ( I used blacks, greys, and whites)
  • twin size cotton or another 100% natural fiber batting
  • black & white thread
  • typewriter fabric or another fabric for fussy cut applique
  • a light weight iron-on fusible interfacing (HeatnBond Lite)
  • fabrics for the quilt backing and binding
  • rotary cutter/mat/ruler set

* Notes * 
  • Synthetic batting is not suggested, I only use a natural batting. It is important to be able to press the batting with a hot iron and steam. 
  • Low-loft batting is preferred.
  • Quilt blocks can be made in any pattern and size..
  • Have fun with your quilting, this is the perfect time to experiment with new stitches or Free Motion Quilting!
  • This method does not include the quilt backing fabric. I like to add my quilt backing at the end, to avoid hand-sewing, which is really hard on my hands.

Black & Whites + Ruby Star Shining

Making a Log Cabin Style Block : :

1. For this quilt tutorial, I made off-centered log cabin style pieced quilt blocks. To make the blocks for the applique and stitched words, begin with a piece measuring a 7.5" square. Using fabric strips in widths varying from 2" to 4" add each new "log" working around that first square. I cut my strips (logs) longer as I went, trimming back after each piece has been added. Continue until you have a block measuring a 17" square

step 1
Step 2

Applique Block : :

2.  Prepare the applique pieces by following the light weight iron-on fusible interfacing directions

step 3

3. Remove the interface backing and position applique piece in the center of the block, then press with a hot iron to set  4. Baste the quilt block to a piece of batting measuring at least a 17.5" square  5. Sew just inside the raw edge of the applique piece, attaching it to the quilt block and batting layers 

Step 4

6. Add the quilting stitches, removing pins as you go, if you pin basted. For my blocks, I quilted with straight lines, using the edge of my presser foot as my spacing guide. If needed, you can mark where you want the quilting lines with a disappearing ink pen before hand. I like to be more improv and free with this type of quilting. I often change directions and make up the quilting pattern as I go

0 Quilting stitches

7. Using a rotary cutter, ruler, and cutting mat, square up the quilted quilt block by trimming away the excess batting to measure a 16.5" square block

quilt batting trim

Stitched Typography Block : :

8. Make another log cabin block, this time beginning with a 7.5" square in a white fabric, building out until you have a 17" block. 9. Baste this block to a piece of batting measuring at least a 17.5" square

continue making blocks

9. Using the built-in letter stitches in the Block style, plan out your text. I used special little sayings and song lyrics that are meaningful to me and my family. Add the text, moving slowly across just that first white square, until it's filled in with the text

stitched typography

10. Continue making the log cabin style blocks, adding both the applique and text to the centers, as well as making several blocks with only a variety of solid and print fabrics. For a throw size quilt measuring 48" x 64", you'll need 12 - 16.5" blocks

continue making log cabin blocks

Joining the Quilted Blocks : :

11. Place two quilted quilt blocks right sides together, matching up all ends and pin in place. Sew together on one side using a 1/4" seam allowance

step 5

12. Using a very hot iron with steam, press the back seams open

press seams open

13. Continue sewing together the quilted quilt blocks, pressing all seams open as you go. Press the quilt top front as you go, as well

back side

B & W QAYG Quilt top

Quilt Backing, Basting, & Binding : :

14. Piece together fabrics for the quilt back to measure a large 49" x 65" piece, and baste to the quilted quilt front.  I love using 505 basting spray for this, however pin basting works just as well

step 6

15. Working your way down from the top of the quilt to the bottom, with a stitch length set at 3, simply sew about 1/4" to maybe 1/2" from the seam lines (when adding this stitching it IS recommended that you do use a Walking Foot). I continued this for both sides of each seam running from the top of my quilt to the bottom, as well as side to side. The photo on the right is an example of what these stitches will look like from the back side of the quilt

step 7

16. Finally, bind the quilt using your preferred method, and Voila! Your Typography Quilt is finished!!

Typography QAYG Quilt
Quilt back

If you've given this tutorial a go or plan to, be sure to share on my Facebook page or in my Maureen Cracknell Handmade Flickr group! I'd love to see it!!    Maureen 

Tuesday, November 5, 2013

For Kaiden : :

Kaiden's Pile

This past Sunday morning I finished up my Making Rows Quilt top, a quilt-as-you-go style quilt I'm making to give Kaiden on Christmas. I had mentioned when I shared my Diamond Strings Quilt that Kaiden had such grand ideas for his design that it could take just as long to make, as it's taken me to make the eight I've already finished. That, combined with him changing his mind sort of often, was making me a little nervous as to whether I could reach my goal of making my three kiddos and each of my brother's & sister's children a quilt of their very own to handout at Christmas time.

With so much on my plate besides this quilt goal of mine, I decided to just go for it and I started a quilt for Kaiden using fabrics I knew he'd like, in a color-scheme I knew he'd love. I showed him some peeks along the way and I'm happy to report he's thrilled with it! I felt especially proud after noticing how very similar the quilt I made for him is to the items he chose for himself when we recently went Winter clothes shopping. Yay, victory!

For Winter

I quilted each row using my go-to quilt-as-you-go method, with mostly straight line quilting, adding in just a few decorative stitches here and there!

Stitchy -- QAYG

Quilted Rows

I chose a 100% cotton, plaid flannel shirting for the quilt back that is soooo perfect!

on my table cropped

I'm basting this one today and I'll be back tomorrow with a Sunset Quilt finish to share! I glanced over those quilt photos just now as I was putting these together, and I'm so excited! Be sure to stop back!!

  Maureen

Wednesday, October 2, 2013

Making Rows : :

Well, it certainly feels like I'm on a roll with these quilts and that feels so good! Late Friday night I spent about an hour beginning this new quilt project. I've changed directions with these particular fabric pulls several times already -- see here, here, and now here!

On My Table

But, I've happily decided to settle on making rows. This is something I've wanted to do for awhile and I'm loving what I have so far!

A few pluses, some geese, and lots of 2.5" strips waiting to become something!

Making +'s

Making  > | > | > Geese!

I'm using Denyse Schmidt's new Florence collection in the Carnelian colorway that I recently stashed from the Knotted Thread, combined with a few more Denyse & some Julianna Horner prints I picked up on a recent trip to JoAnn Fabrics, a Text Me Maybe Bundle from Stash Fabrics, and that lovely Kona Cotton Wine Cellar Colorstory Bundle. It's very Fall-ish don't you think?

Making Rows Quilt -- Fabric Pulls!

New Quilt Plans!

I began this new quilt project with such a strong row of deep reds, blacks, & white, that it might be a little tricky to transition into all these oranges, but I think I can make it work. They're so beautiful!

Very Fall-ish!

Saturday we spent the day unplugging at one of our most favorite places -- Allegany State Park. We hiked, played in the creek, and fished. It was wonderful! I brought along a new handwork project, which I plan to share tomorrow, and my sketchbook!

Red, Black, & White Quilt Sketching

While Kevin fished and the kids jumped from rock to rock, I planned out my next few more rows.

Leaf Inspiration

Today, with this gorgeous image fixed in mind as inspiration, I'm super excited to continue this new quilt work-in-progress!

Science Lake & Kevin

  Maureen

Friday, April 26, 2013

A Fabric GIVEAWAY : :

*  *  *  *  *  *  *  *  *  *  *  *  *  *  *  *  *  *
It's Fabric Giveaway Friday!

For Friday's Fabric Giveaway!!
    
*  *  *  *  *  *  *  *  *  *  *  *  *  *  *  *  *  *  *  * 
stash

My sponsor Stash Fabrics is an online store full of fresh, modern fabric. They carry many of our favorite designer fabrics, including Riley Blake, Art Gallery, Free Spirit, Cloud9, Moda, and many more! They offer FREE shipping on all orders over $50 in the US!!

We invite you to visit Stash at their --

 SHOP  *  BLOG  *  FACEBOOK
  *  TWITTER  *  INSTAGRAM
 

* * * * * * * * * * * * * * * * * * * * * * * * * * * * * * * * *
We hope you enjoy visiting the Stash Fabrics sites!! 

22754
For this weekend's Fabric Giveaway, Stash Fabrics is offering their very cool, custom Test Me Maybe Fat quarter Bundle! This bundle includes 14 Fat Quarters, one in each of the prints pictured, for a total of 3.5 yards of fabric! WOW, I LOVE these fabrics!

Be sure to check out Stash Fabric's wonderful variety of custom bundle, stash builders HERE!!

In addition,  Stash Fabric's is having a wonderful Spring Cleaning Sale! And don't forget to use Stash Fabric's coupon code SHIPFREE50, to receive free US shipping on any order over $50!! 

For Friday's Fabric Giveaway!!
 
Enter to win!

Here's how,   

1. Simply leave a comment here in this post! (one entry)
2. Follow Stash Fabrics on Facebook, Instagram, or signup to receive the
Stash Fabric Newsletter, you can subscribe by simply entering your email found on the right sidebar of the Stash Blog. Just let me know that you did by making a separate comment here to record that entry. (optional extra entry)
3. My followers get a third entry! Whether you follow me here, on Facebook, or on Instagram, just let me know that you do by making a separate comment here to record that entry. (optional extra entry)
4. Help spread the word!! I know that many of you already do, so I thought it would be nice to add that as another way to enter! Whether by tweet, facebook, pin, blog, etc... (optional extra entry) 

That’s 4 possible entries! Enter now through midnight Monday, April 29th. The winner will be chosen by Random and I will announce their name Tuesday, at the bottom of this post, here on the blog!
 
 
* Note * This giveaway is open to EVERYONE! If you're a "no reply" or anonymous commenter, please remember to include your email address in your comment!                    

+ + + + + + + + + + + + + + + + + 
Thank you to all who entered the Giveaway!! 
  *  *  *  *  *  *  *  *  *  *  *  *  *  *  *  *  *   
  From 1,825 entries, Mr. Random says the lucky winner is...
*  Comment #591 -- Christine Slaughter *  

Congratulations!!! I will be in touch shortly!

Tuesday, April 16, 2013

A Stitched Typography Quilt & Family Photoshoot : :

A little more that a week ago we took a quick drive out to Cherry Springs State Park for a new quilt photo-shoot and some Sunday fun. It was a sweatshirt warm afternoon, but up in the woods there were still a few lingering piles of snow that we knew the kids would love to play in. If photographing in a field of newly bloomed flowers isn't possible, at least the ashy forest of a late-to-arrive Potter County Spring would match my neutral quilt well!

A Typography Quilt

This quilt is a new favorite of all of ours, which is a surprise for how much we all love color! It's made in the quilt-as-you-go style I shared here, in shades of blacks, greys, creams, and whites, with some stitched typography using the built-in letter stitches my Janome offers, as well as some fun applique using Melody's Typewriters!

Bound in Aqua Pezzy Print

From the beginning I had planned to bind it in a black & white stripe, but in the end this aqua Pezzy print won out! The back is finished with a one yd cut of Silver Crosshatch from Angela's new Textures collection for AGF and a modge podge of a few other large cuts of black, greys, and whites that I had in my stash.

Textures by Angela Walters

Typography Quilt Back

You can find this full quilt tutorial on the Janome site, in their Project Center here.  I really hope you check it out, and if you do give this tutorial a go at anytime, be sure to share on my Facebook page or in my Maureen Cracknell Handmade Flickr group! I'd love to see it!!

A Typography QAYG Quilt

Last night after the kids were in bed, I finally went through all the pictures we took that afternoon, as I watched the news. All I could think about was how lucky I am to have my family and how grateful I am for these times we have together. We had taken turns with my camera until my memory card was full that day. These are just a few of my favorites!

Cherry Springs State Park

Spring in Potter County

Photo By Haila

Photo By Me

Kaiden

Kevin

Naptime

Photo By HailaJakey

It was such a great day! More and more I've been wanting to add in just a little bit more of our family life here . Having this little guy who's about to turn nine on Sunday, a marriage that's about to turn eleven on Saturday, feeling so blessed for our full, good, simple life. I really should take advantage of having this space to share these moments, even if it's just to remind me to treasure them a bit more. Today it feels necessary to share and to savor the beauty and happiness I felt looking at these photos, along with the new quilt ones, and the fun we had taking them together as a family.  

Thanks so much for stopping by!  Maureen