

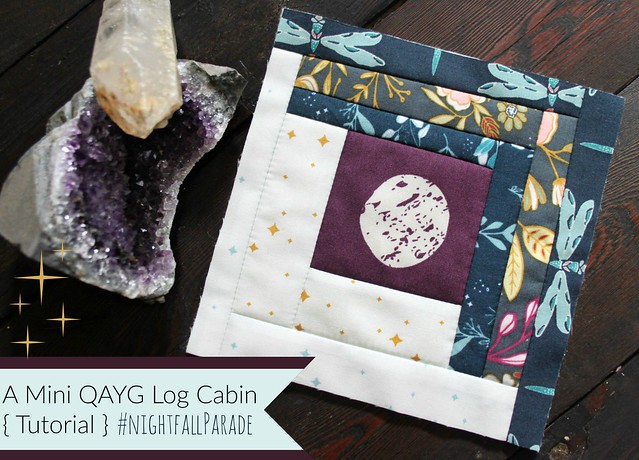
My Mini QAYG Log Cabin tutorial is a Quilt-As-You-Go style quilt block, featuring my Nightfall fabric collection, that you can use to create a beautiful Moon & Stars Floor Pillow!
Fabric and Materials Required : :
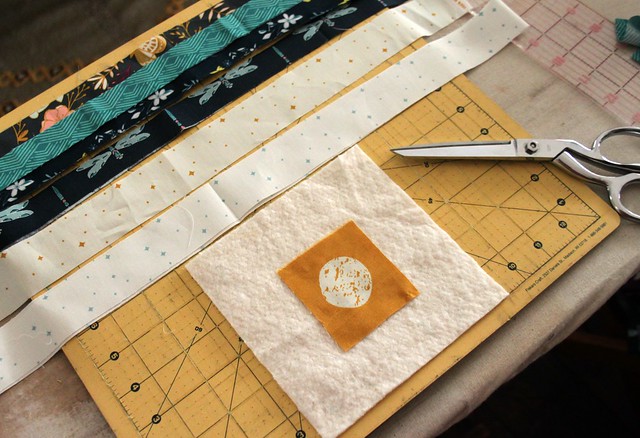
- a variety of four different teal & blue Nightfall prints cut into 1" strips x WOF
- several 1.5" x WOF strips of both Luminaries in Silver & Gold
- Sixteen fussy cut moons { eight from Lunation Light || eight from Lunation Dark }
- Sixteen 6" cotton batting squares
- fabrics for the pillow backing and binding
- 22" pillow insert
- rotary cutter/large cutting mat/ruler set
- sewing pins
* Notes*
- Synthetic batting is NOT suggested, only use a 100% cotton batting. It is important to be able to press the batting with a hot iron and steam.
- Use a Low or standard loft batting. The #1 question I receive about QAYG is folks wanting to know if the seams are bulky. My answer is NOPE, not to a noticeable degree I promise.
- This style of Log Cabin quilt block can be made into any size! The measurements I'm sharing makes a large floor pillow, but feel free to adjust to any size.
Now, let's get started!!
Making the Blocks : :
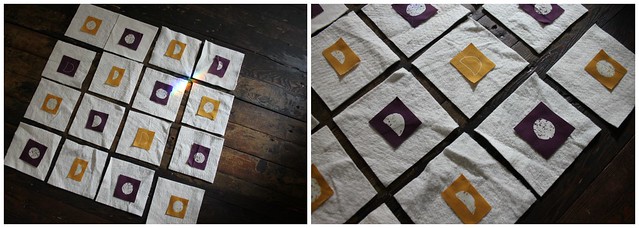
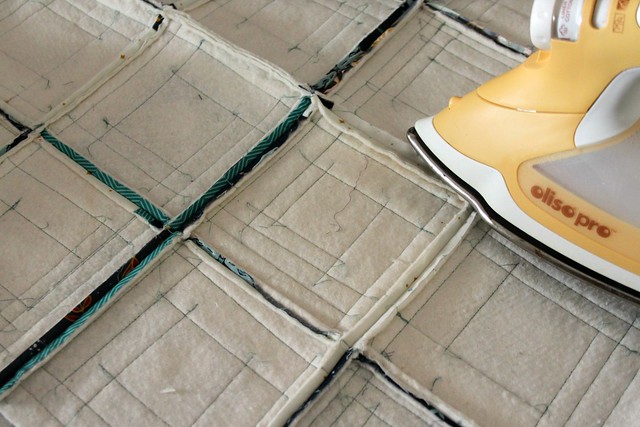
1. Begin by preparing your materials. I cut leftover cotton batting scraps into sixteen 6" batting squares.

2. Place a single fussy cut moon, alternating colors, in the center of each of the sixteen batting squares.
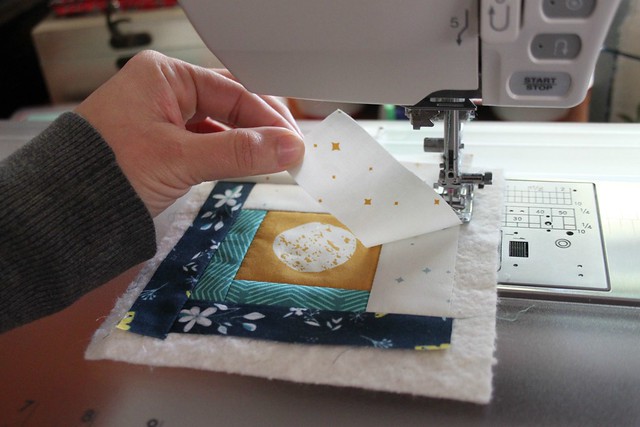
3. Begin adding the fabric strips {logs}. Cut two strips from one of the dark Nightfall prints. At the sewing machine, place one strip right sides facing the moon fabric and sew a 1/4" seam along the raw edges on the matched up side. You will be sewing through the batting, permanently attaching the fabrics in place. Once attached, open the fabrics so the right side is exposed and smooth to press with your hand.

4. Add the next two strips exactly the same way, but this time using a low volume Luminaries star print. Attach these logs continuing with a 1/4" seam, smooth & press open as you go.
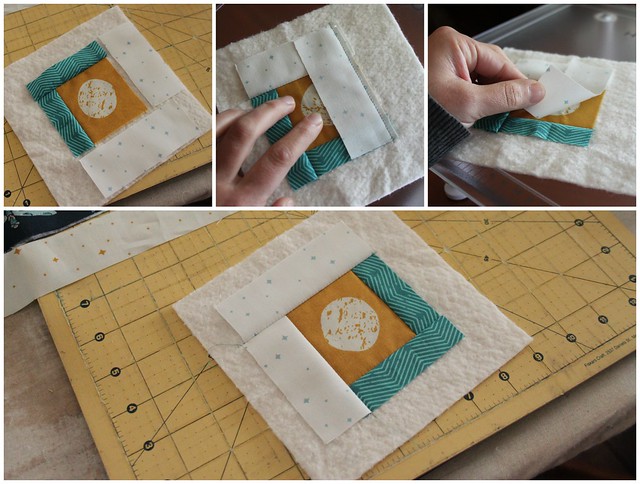
5. Work your way around the center moon, alternating the dark 1" Nightfall strips with the 1.5" Luminaries prints, adding each log, stitching, flipping, and pressing until you fill up each batting square.
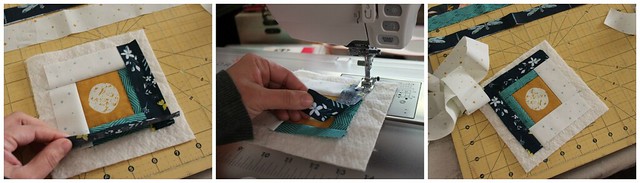
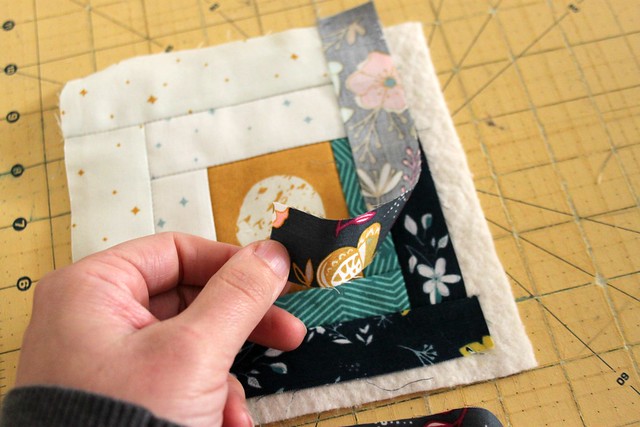
6. Once the fabrics have been added to each batting square, use a mat, ruler, and rotary cutter to trim to a 5.75" square.

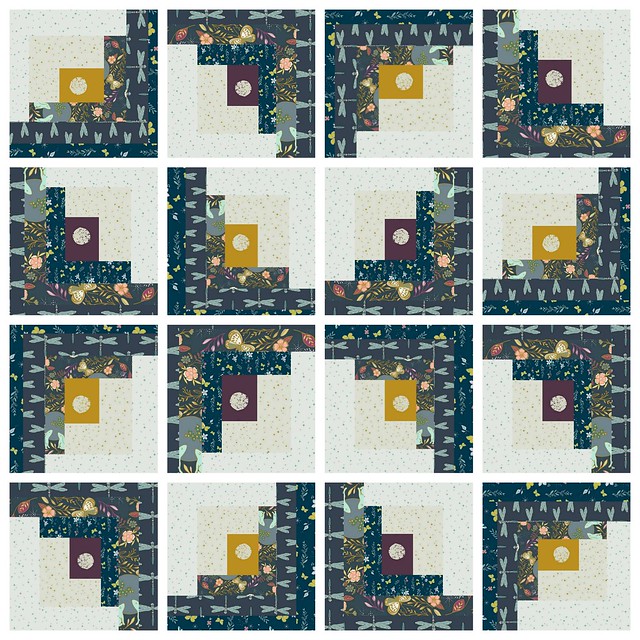
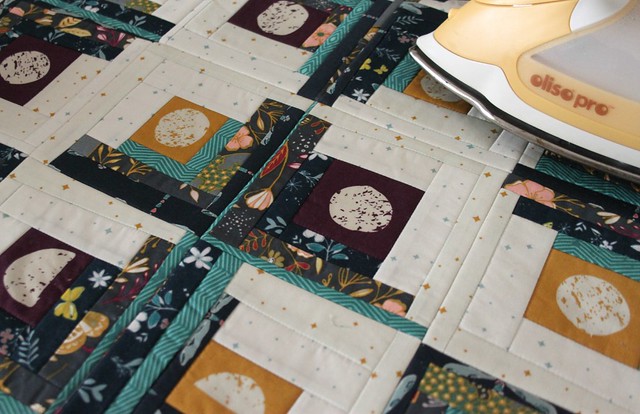
Use the diagram below to arrange the finished mini log cabins in the Moon & Stars pillow top design.

Joining the QAYG Blocks : :
7. Begin with two blocks and place them right sides together. Use sewing pins to secure their place and sew along one side keeping a 1/4" seam allowance. Use a hot iron with steam to press the seams open as you join them.

8. Repeat this step with the remaining blocks, sewing them together, pressing all seams open as you go.

9. Press the pillow top front well once all the mini log cabins are joined together.

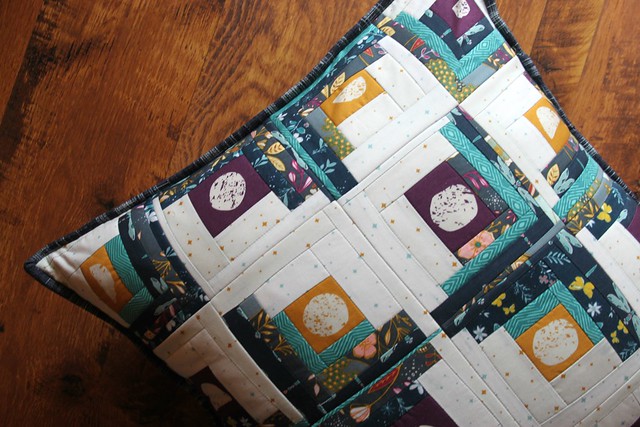
Finishing the Pillow : :
10. Prepare the backing fabrics with a double seam or bound edge to finish with an envelope style closure.
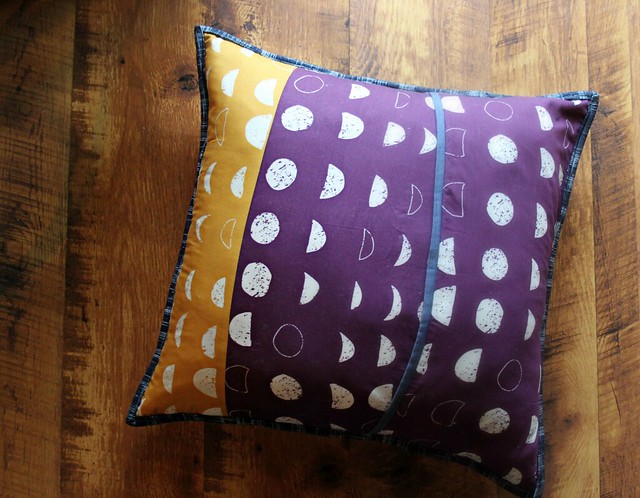
11. Using your favorite quilt binding method, bind the pillow just as you would any quilt. Insert the pillow form and Viola, your pretty Moon & Stars Floor Pillow is finished!

If you do give this tutorial a go at anytime, be sure to share on my Facebook page or on Instagram with the hashtag #NightfallFabrics & #NightfallParade -- I love seeing what you create!
Thanks so much for stopping by today!! ♡ Maureen
--------------------------------------------
* You can find the list of online retailers currently carrying Nightfall under my SHOP my Fabrics page -----> https://maureencracknellhandmade.blogspot.com/p/blog-page.html
Thank you for this nice tutorial.
ReplyDeleteThank you for taking the time to prepare this tutorial! I can't wait to try it.
ReplyDeletethank you for the tutorial! it's a nice project!
ReplyDeletethank you so much Maureen for this tutorial! you are so generous with your time and skills. your photos are always so pretty. I have your whole line of fabrics and I am making a Propeller quilt right now but I will have enough fabric for some log cabin fun later!!:) also congrats on your new line: it is AWESOME!!!! can't wait to get my hands on it!
ReplyDeleteThanks for the tutorial, I love how you bind your pillows.
ReplyDeleteI showed my FQ bundle of your Nightfall to my sister last week and I may have to make her some of these pillows from it.
ReplyDeleteThis is a great tutorial! Do you add a lining to the back of the QAYG pillow front?
ReplyDeleteThanks you for the great tutorial.Your pillow is stunning!
ReplyDeleteOur decorator fabric will make an excellent addition to any home with its character and style.braemore fruit fabric
ReplyDeleteAwesome ! Thank you for this article, as comprehensive and truly relevant usual!
ReplyDeleteThank you very much for this article as always very interesting.
ReplyDeleteGreat tutorial - thank you
ReplyDeleteBravo pour le blog et vos articles.
ReplyDeletevoyance gratuite par mail rapide
At this point you'll find out what is important, it all gives a url to the appealing page: mini sewing machine
ReplyDeleteThis comment has been removed by the author.
ReplyDeleteSpecial thanks to HACK VANISH, a professional hacker I’ve been hiring for the past 2 years because, I find him to be an outstanding hacker who has aided me in various hacking related issues, ranging from fixing my poor FICO credit score of about 437 TransUnion, 462 Equifax to 802 plus excellent score, tracking my cheating husband’s phone and currently has helped me recover my lost crypto funds from an online scam investment I recently ventured into, I must confess he is the best, quite brilliant, ever since I discovered him through a positive review I saw on Wallet Hub and reached out to him via Email: HACKVANISH @ GMAIL. COM, and Phone: +1(747) 293-8514, to which he responded in less than 10mins, I have never regretted working with him, he’s been quite helpful and highly efficient. I Would recommend his services to anyone without hesitation.
ReplyDeleteWelcome to BetBhai9, your ultimate destination for live sports betting, online gaming, and Indian classics like Teen Patti and Rummy. Experience fast and secure transactions, round-the-clock support, and a user-friendly platform designed specifically for Indian players. Join now for a thrilling and hassle-free gaming journey!
ReplyDeleteEnjoy live sports betting, exciting games like Teen Patti and Rummy, secure transactions, and 24/7 support—all tailored for Indian players. Join DiamondExch9 today for an unparalleled gaming experience!
ReplyDeleteExperience live sports betting, thrilling games like Teen Patti and Rummy, secure transactions, and round-the-clock support—all designed for Indian players. Sign up with DiamondExch9 today for a gaming experience like no other!
ReplyDeleteBet on cricket, football, and more while enjoying classic games like Teen Patti and Rummy. With secure transactions, a user-friendly platform, and 24/7 support, Betbook250 is your one-stop destination for an exciting online gaming experience. Join now!
ReplyDeleteDreamexch is a premier platform for online enthusiasts seeking a secure and engaging experience. Offering diverse sports markets like cricket, football, and tennis, Dreamexch combines competitive odds with a user-friendly interface to make betting seamless. With robust payment options including UPI and Paytm, secure transactions are guaranteed. Its 24/7 customer support ensures that users receive timely assistance, enhancing the overall experience. Whether you're a beginner or a pro, Dreamexch provides a reliable and exciting environment to explore and enjoy. Sign up today and elevate your gaming experience!
ReplyDeleteBet on cricket, football, and enjoy classic games like Teen Patti and Rummy. With secure transactions, a user-friendly platform, and 24/7 support, 12bet India offers a seamless gaming experience tailored for Indian players. Join now!
ReplyDeleteGullybet is a versatile platform offering an exciting blend of sports betting and online gaming. With a wide range of options, including cricket, football, poker, and slot games, it caters to players of all interests. Gullybet stands out with its user-friendly interface, competitive odds, and secure payment options like UPI for seamless transactions. The platform also provides 24/7 customer support to ensure a hassle-free experience. Whether you're a seasoned player or a beginner, Gullybet is the ideal destination for entertainment and rewards. Sign up today and start your winning journey!
ReplyDeleteT20 Exchange is a trusted platform for sports betting and online gaming enthusiasts, offering a seamless experience with a focus on cricket, tennis, and other popular sports. With features like live betting, live casino games, and 24/7 customer support, it ensures a user-friendly and exciting environment. Secure payment options and multilingual support make it accessible for users across India. Whether you're a pro or just starting, T20 Exchange provides reliable services with an emphasis on responsible gaming. Join T20 Exchange today and elevate your sports betting experience!
ReplyDeleteWorld777 is a popular online platform offering an exciting mix of sports betting and casino gaming. With options like cricket, tennis, poker, Teen Patti, and slot games, it caters to players with diverse interests. The platform boasts a user-friendly interface, secure payment methods, and regular bonuses to enhance your gaming experience. Whether you’re a seasoned bettor or a casual gamer, World777 ensures fair play and 24/7 customer support for a seamless experience. Sign up with World777 today and enjoy thrilling games and top-notch betting opportunities!
ReplyDeleteSatsport247 is a platform made for people who love sports and online games. It has many options for betting on cricket, football, tennis, and even virtual sports. You can also play games like slots, and live dealer games. The site is easy to use and works well on mobile too. Payments are simple and secure, with options like UPI and GPay. If you need help, their support team is available 24/7. Join Satsport247 today to enjoy sports betting and fun games with great offers for Indian players.
ReplyDeleteDiscover Play247, your reliable platform for seamless, secure, and convenient online gaming access. Enjoy advanced security, fast logins, and 24/7 support, making ID management effortless. Join now and enhance your gaming experience!
ReplyDeleteExperience Yolo247, your trusted platform for fast, secure, and exciting online gaming. Enjoy seamless access, quick transactions, and 24/7 support with a user-friendly interface. Join today and elevate your gaming journey!
ReplyDeleteExperience Satsport247, your trusted platform for fast, secure, and hassle-free online gaming. Enjoy advanced security, smooth logins, and 24/7 support, all on a user-friendly platform. Join now and elevate your gaming journey!
ReplyDeleteExperience secure, fast, and hassle-free online gaming with Yolo365. Enjoy quick logins, seamless transactions, and 24/7 support on a user-friendly platform designed for your convenience. Join today and elevate your gaming experience!
ReplyDeleteJoin 11xplay Signup for a fast, secure, and user-friendly gaming experience. Enjoy quick registration, advanced security, and 24/7 support. Start your online gaming journey today with a platform you can trust!
ReplyDeleteBetbhai9 is a popular platform for cricket and sports betting, made for Indian players. It offers easy-to-use features where you can place bets on cricket, football, and other games. You can also enjoy fun sport games like, Teen Patti, and slots. Betbhai9 has safe payment options like UPI and Paytm, so deposits and withdrawals are quick and simple. The website works smoothly on mobile phones too. With 24/7 customer support, it’s a reliable option for betting lovers. Start with Betbhai9 today and enjoy betting in your style!
ReplyDeleteGreat content! You’ve explained the topic well, making it helpful for readers. Adding more examples could make it even better. Thanks for sharing such valuable insights! 😊Cricbet99 is a user-friendly platform for betting on cricket, football, and more. It also offers casino games like poker and slots. With secure payments, 24/7 support, and exciting bonuses, Cricbet99 is great for gaming and betting fans.
ReplyDeleteExcellent content! Clear, helpful, and engaging. Thanks for sharing! Reddy Anna Book is an easy platform for cricket and sports betting with secure payments, good bonuses, and quick support. Perfect for Indian users!
ReplyDeleteI really enjoy reading your blog! You break down tough subjects in a way You explain everything so clearly You make difficult topics easy to understand, and I enjoy reading and exploring more of your insightful work. India24bet
ReplyDeleteThank you for the kind words! Glad you found the content helpful and engaging.
ReplyDeleteSkyfair offers a user-friendly platform for cricket and sports betting, featuring secure payment options, attractive bonuses, and prompt customer support—an ideal choice for Indian users
Great article! Well explained and helpful. More examples could make it even better. Thanks for sharing! 99exch is an easy-to-use platform for betting on cricket, football, and other sports, plus games like andar bahar and slots. It offers safe payments, 24/7 support, and great bonuses. Perfect for online betting and gaming lovers!
ReplyDeleteGreat and informative content! You explained the topic well, making it very helpful for readers. Adding more details or examples could enhance its impact. Overall, your article is engaging and insightful. Thank you! Betbook247 is your trusted online betting site in India. Easily bet on cricket, football, and more with our safe and simple platform. Join thousands of Indians today and enjoy hassle-free betting!
ReplyDeleteGreat and informative! Clear explanations make it very helpful. Adding more examples could enhance it. Engaging and insightful article. Thanks! Goexch9 is an easy-to-use platform for betting on cricket, football, and sport games. It offers secure payments, 24/7 support, and great bonuses. Perfect for Indian users to enjoy betting anytime
ReplyDeleteSky99Exch is a trusted platform for secure sports betting and online games. Enjoy a user-friendly experience, quick payouts, and exciting gaming options all in one place!
ReplyDeleteGreat content! Clear and helpful explanations. Adding examples could improve it. Thanks for the engaging article! Yobook2477 offers secure betting with competitive odds, user-friendly features, and 24/7 access. Enjoy bonuses, fast payouts, and a seamless experience. Perfect for sports enthusiasts!
ReplyDeleteInformative content! You explained the topic well, aiding readers. Adding details or examples could enhance it. Overall, engaging and insightful. Thanks for the content! Reddy Book Club offers secure sports betting and casino gaming, including cricket, football, rummy, and more. With user-friendly features, secure transactions, 24/7 support, and exciting bonuses, it’s a top choice for gaming enthusiasts. Join now for a seamless experience!
ReplyDeleteGreat article—very informative and well-explained! Adding more examples could enhance it further. Thanks for the valuable insights! Reddy Book Club offers secure sports betting and casino games like cricket, football, and rummy. With a user-friendly interface, 24/7 support, and exciting bonuses, it’s perfect for gaming enthusiasts!
ReplyDeleteYour blog is a joy to read clear and engaging way. The way you approached specific point was really interesting, and it gave me a fresh perspective on topic. I enjoyed reading your insights. Reddy Anna Book
ReplyDeleteSatsport is your ultimate destination for cutting-edge sports insights and services in India. Offering a seamless platform for sports enthusiasts, we specialize in delivering real-time updates, secure transactions, and an unmatched user experience. Discover the best of sports engagement with Satsports today!"
ReplyDeleteThis post is fantastic! You break down complex ideas with clear examples everyone can relate to. Your writing is clear and fun to read. Looking forward to reading more of your posts. Goexch9
ReplyDeleteI really like how you explain difficult things in a simple way! Your examples help me understand everything better. I enjoyed reading your blog post and can't wait to read more of your work. Allpaanel
ReplyDeleteGreat Teaching Style You're really good at making hard topics easy to understand. Your examples are clear and useful. You write like you're talking directly to us, which makes your content fun to read. I've learned a lot and look forward to more! Sky247
ReplyDeleteClear and Helpful Writing Your writing is easy to follow and well-thought-out. You explain hard topics really well and use great examples to make things clear. Your blog helps me learn, and I'm excited to read more! Laserbook247
ReplyDeleteYou explain difficult things really well! Your clear examples helped me understand topics I found confusing before. I can tell you love teaching, and we appreciate it. Thanks for making everything easy to understand. Sky247
ReplyDeleteI love how you approach teaching with such clarity and enthusiasm. You don’t just explain concepts—you make them meaningful and easy to apply. Aura444 Your posts have helped me understand things I thought I’d never get, and I can’t thank you enough for that!
ReplyDeleteYou explain things so well that difficult subjects become easy to understand. You help me truly understand rather than just memorize because you make everything clear and connect it to real life. It's such a great way to learn. Mahadev Book
ReplyDeleteGoexch This blog was fantastic! Your writing is very clear, and you explain complex topics in a simple and interesting way. The content flows well, making it easy to follow. Your examples and insights are helpful and memorable. You clearly put a lot of work into this, and it shows. I look forward to reading more. Thanks for sharing.
ReplyDeleteWow—what a great read! You explained everything so clearly and accurately, which is really impressive. You found the right mix between a professional tone and a friendly style, making the content much more enjoyable. I especially liked the clear structure and the real-life examples—they really helped me understand the ideas better. It’s obvious that you put a lot of thought and effort into this, and I’m excited to check out more of your work. Thanks for such an awesome resource! Playexch
ReplyDeleteThis blog was such an enjoyable read! Your ability to present complex ideas in a way that feels accessible and interesting is nothing short of amazing. The tone strikes a wonderful balance between professional and conversational, making the learning experience both engaging and memorable. I was particularly impressed by how well-organized the content is—it flows naturally and is supported by practical examples that really drive the points home. It’s evident that you’ve put so much effort and care into this, and it truly shines through. Can’t wait to read more of your insights. Radhe Exchange
ReplyDeleteGreat blog! I loved reading it. You write in a clear, fun way and explain difficult topics really well. Your examples helped me understand everything better. It's hard to find blogs that are both smart and fun to read, but yours is both. You clearly know your stuff, and I can't wait to read more. Thanks for sharing. 12bet
ReplyDeleteThis is a great article! It explains difficult ideas clearly and simply. The writing style is professional yet friendly, and the examples help make everything easy to understand. You can tell the writer knows their stuff and worked hard on this. I'd love to read more from you. Thanks for sharing your knowledge. Betbook247
ReplyDeleteGreat blog post! I couldn't stop reading from the start. You explain things clearly and in a way that makes sense. The real-life examples really help show how to use these ideas. I can tell you put a lot of work into this, making it both helpful and fun to read. Thanks for sharing - I look forward to reading more of your posts.World777
ReplyDeleteI really liked your blog! You explained everything clearly and made difficult topics easy to understand. Your friendly yet professional writing style kept me interested throughout. The examples from everyday life were helpful, and I can tell you put a lot of work into this. Thanks for sharing such great content. Fairbet99
ReplyDeleteGreat job! You explained this really well and made it easy to understand. Everything flows nicely and makes perfect sense. You clearly worked hard on this, and it shows. Thanks for sharing - looking forward to seeing more from you! Laserbook
ReplyDeleteBetbhai9 Register allows you to join one of the most reputable online betting platforms. The registration process is simple and user-friendly, enabling bettors to access thrilling games, from cricket betting to live casinos. By registering, you unlock exclusive bonuses, secure payment methods, and a variety of betting options. Whether you’re a beginner or an experienced player, Betbhai9 ensures a seamless and engaging betting experience tailored to your preferences.
ReplyDeleteAllpanel777 consistent growth within the online betting and gaming industry reflects its unwavering dedication to innovation. By blending cutting-edge technology with a broad selection of games and betting options, it has earned a loyal following of players who value both security and a seamless gaming experience. Allpanel777
ReplyDeleteWonderful
ReplyDeleteI really like how Reddy Book Club brings sports betting and casino games together in such a smooth way. The platform feels easy to use, and it’s great that players can enjoy cricket betting along with exciting casino options on the same site. What makes it even better is the focus on security and real-time updates, which builds trust. It’s clear why Reddy Book Club is becoming a go-to choice for gaming lovers looking for fun and reliability.
ReplyDeleteFor more info: https://reddybookclub.ind.in/
I’ve recently come across Merit Badge while searching for a reliable Custom Badge Maker, and I must say their attention to detail is impressive. The quality of their designs and materials really stands out, especially compared to other suppliers I’ve used. I appreciate how they make it easy to customise badges for events, staff branding, or promotional use. The process feels professional yet personal, which is rare these days. If anyone’s looking for a trustworthy Custom Badge Maker in the UK, I’d definitely recommend checking out Merit Badge. Their service is fast, friendly, and absolutely worth it.
ReplyDelete