
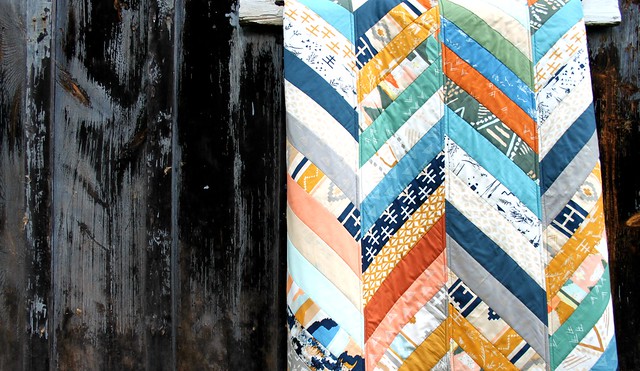
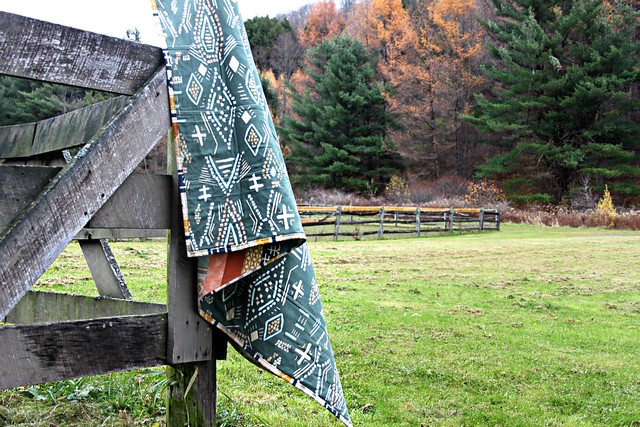
Before moving onto the new things, I had to photograph all the QAYG quilts I've recently made for my Craftsy class & magazines myself. They all do such a beautiful job, of course, but for me a quilt isn't finished when the binding is done or once it's been published. It's not until after we venture out to some nearby farm, field, bridge, forest, stream, or old wooden fence post, right here in Potter County, with that quilt and my camera in-hand until I feel contented and happy. I really hope you get that and don't mind seeing some of these one more time! It was worth it, for me at least, to take the time to do so. It's been awhile since my husband & kids helped me photograph a quilt. With this particular one, my Herringbone Lap Quilt in Bound, I was reminded what fun we have when we do, how special it feels, and how beautifully these quilts I make couple with home.
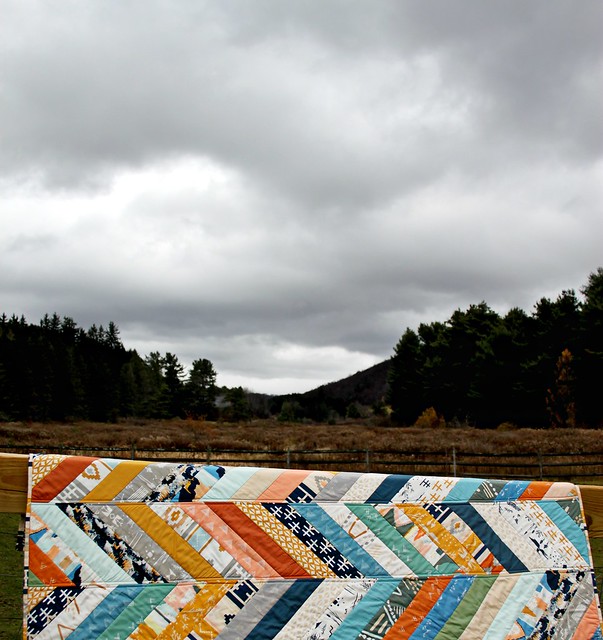
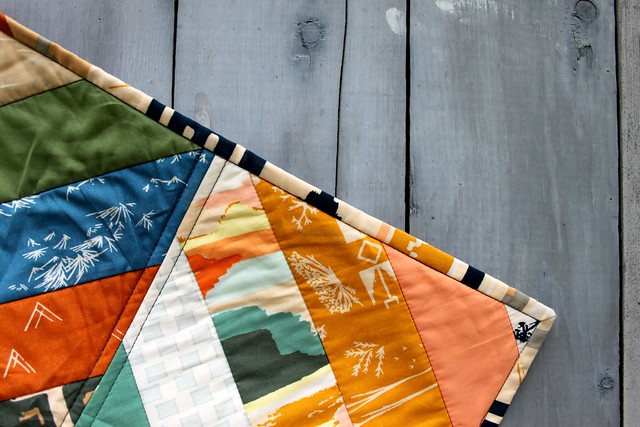
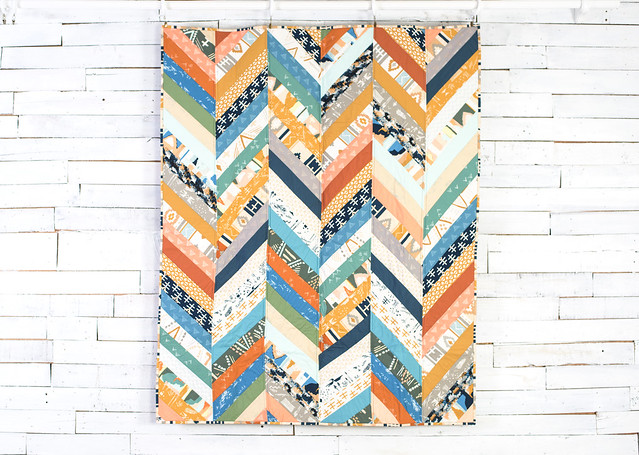
For those of you seeing this quilt for the first time, it's made using the Herringbone quilt as you go pattern I teach in my brand new Craftsy class, Quick Quilt As You, on sale here for the remainder of this month. This is my very favorite quilt to make, it's incredibly fast and so much fun!
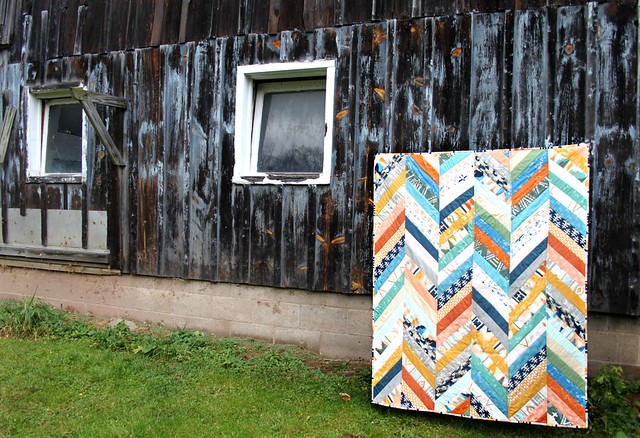
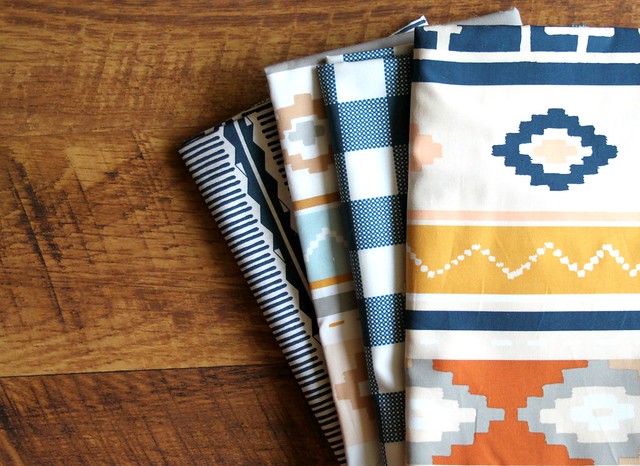
I used April Rhodes' Bound collection for Art Gallery Fabrics with a mix of Pure Element solids and Prisma Element blenders. April's fabric designs match the landscape here so perfectly, it really is stunning!
Even the backing fabric, her Macrame Cave print, with it's unique shade of green and brushstroke details, coordinate with the Autumn surroundings. So pretty!
For the final, very minimal quilting I kept it all April Rhodes' using a navy Aurifil 50wt from her Arizona thread collection.
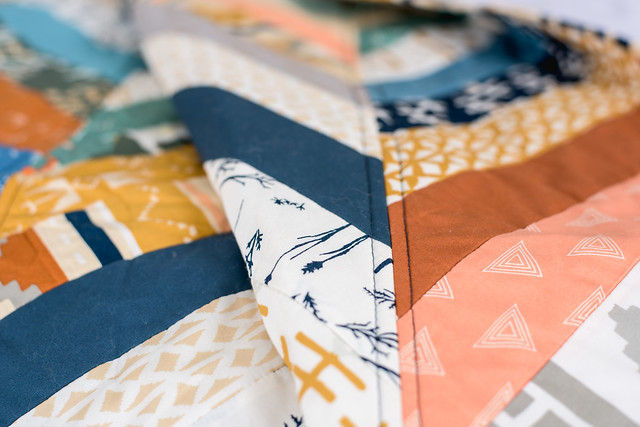
For the binding I used the top print shown below, my personal favorite print from this collection, Bound Humanity.
More and more I get asked about my particular method for machine quilt binding. I talk about it in my class, describing what I do, but since I don't demonstrate it completely I continue to receive questions. Before I put together a machine binding tutorial to share here, I thought I'd ask if any of you have or have seen a tutorial that already exists in blogland? I'm looking to reference a how-to where the binding is attached to the front of the quilt first, folded (pressed) over, and to finish you stitch in the ditch from the front side catching the back edge of the binding? Let me know!
This quilt finishes at a 48" x 56." While I don't typically make quilts this size, I usually go to a 60" square at the very least, in making this I realized what a perfect single person quilt this is. It really is all you need! Making it a perfect quick pattern for gift-giving and donating!
Tomorrow I'll be back with another QAYG quilt photoshoot to share, be sure to stop back!
♡ Maureen
For those of you seeing this quilt for the first time, it's made using the Herringbone quilt as you go pattern I teach in my brand new Craftsy class, Quick Quilt As You, on sale here for the remainder of this month. This is my very favorite quilt to make, it's incredibly fast and so much fun!
I used April Rhodes' Bound collection for Art Gallery Fabrics with a mix of Pure Element solids and Prisma Element blenders. April's fabric designs match the landscape here so perfectly, it really is stunning!
Even the backing fabric, her Macrame Cave print, with it's unique shade of green and brushstroke details, coordinate with the Autumn surroundings. So pretty!
For the final, very minimal quilting I kept it all April Rhodes' using a navy Aurifil 50wt from her Arizona thread collection.
For the binding I used the top print shown below, my personal favorite print from this collection, Bound Humanity.
More and more I get asked about my particular method for machine quilt binding. I talk about it in my class, describing what I do, but since I don't demonstrate it completely I continue to receive questions. Before I put together a machine binding tutorial to share here, I thought I'd ask if any of you have or have seen a tutorial that already exists in blogland? I'm looking to reference a how-to where the binding is attached to the front of the quilt first, folded (pressed) over, and to finish you stitch in the ditch from the front side catching the back edge of the binding? Let me know!
This quilt finishes at a 48" x 56." While I don't typically make quilts this size, I usually go to a 60" square at the very least, in making this I realized what a perfect single person quilt this is. It really is all you need! Making it a perfect quick pattern for gift-giving and donating!
Tomorrow I'll be back with another QAYG quilt photoshoot to share, be sure to stop back!
♡ Maureen
That is really beautiful. I love seeing it in those settings.
ReplyDeleteIt truly is special to me, to be able to share them photographed in this place that I love so much. Thank you!
DeleteLovely, Maureen! Just lovely!!
ReplyDeleteRita from redpepperquilts.com has a great tutorial on binding where you attach to the back then fold over and stitch in the ditch. I don't have the link handy, but I'm sure it wouldn't be hard to find!
ReplyDeleteYes!! Thank you, that's it! http://www.redpepperquilts.com/2009/11/binding-tutorial.html
DeleteSomehow, amazingly enough since I happen to be a huge RPQ fan, I don't recall ever seeing her method before. Mine evolved from Cluck Cluck Sews method.
Just a few differences -- I do cut my strips to 2.5" still, I do not zig zag the two outside edges of the binding together, I do not pin, and I press over the binding well to the back of the quilt, overlapping the stitching line made when sewing the binding to the front of the quilt. I think ironing here really helps get a nice crisp binding. Thanks!!
gorgeous herringbone--i like that small size a lot!! And i have not seen that kind of binding
ReplyDeleteanywhere....hugs, Julierose
Maureen, Red Pepper Quilts covers the binding method you mentioned on her blogspot and Crazy Mom quilts has a great tutorial on binding corners.
ReplyDeleteHi, Maureen, I'm taking your QAYG class and enjoying it immensely. Love the herringbone. I'm not sure if this is the method you describe above, but I believe it is
ReplyDeletehttps://www.youtube.com/watch?v=ji8BLS2rNHA
It is Part Three of a three-part tutorial.
Sharon
Thank you! I will be sure to check it out. Please be sure to share your class projects with me, thank you for joining in, I can't wait to see!
DeleteThey are all so beautiful. I've been thinking about photographing my work. But in a large metropolitan area, I guess the only place would be the block wall in the yard, yuck. Any other suggestions. I'd really would love to have pictures of them before I give them away.
ReplyDeleteThere is a binding tutorial like that on Cluck Cluck Sew I believe, you can check it out here http://cluckclucksew.com/2013/01/machine-binding-tutorial.html
ReplyDeleteYes, that's the tutorial I used to reference and then it started getting pointed out to me the difference, she sews right along the edge of the binding from the back side, sewing to the left of the seam line, creating a straight stitch line on the front of the quilt. Where I stitch in the ditch from the front side of the quilt, catching the edge of the binding on the back side.
DeleteI always enjoy your 'beauty' shots of your quilts. While I always try to get some photographic record of my quilts, they often fall far short of beautiful. Looking at yours makes me realize I really should try harder. :-)
ReplyDeleteJust bought the class, I can't wait to sew along with you! Beautiful quilt!
ReplyDeleteThe Fat Quarter Shop has a great YouTube video of machine binding!
ReplyDeleteYes, I started with the red pepper quilt binding method as well. I always had trouble catching all the binding. I wonder if your pressing trick would help. In the meantime I just went to a zig zag stitch, and haven't had any problems since. It is a bit more visible, but I don't think it detracts from everyday quilts.
ReplyDeleteI bind the same way as you do, sew to the front, press over with a hot iron, then stitch in the ditch to catch the back, I've learnt to use my 1/4" foot as a guide while stitching it down and to cut my strips *just* over 2.5". I sort of took the best bits from both of the tutorials, Cluck cluck sew and RPQ's and use what worked for me lol
ReplyDeleteMaureen: I actually have a step-by-step photo tutorial of the binding method you are describing! It's my favorite method: http://beechtreelanehandmade.com/2015/10/20/machine-binding-tutorial/
ReplyDeletePileofabric.com has a binding tutorial from 2013 that uses glue basting to hold the binding in place so you can be sure to catch it when you stitch in the ditch
ReplyDeleteLovely in every way. I'm definitely going to take your class - some day! - I still can't wrap my brain around all aspects of QAYG, and would like to learn how to do it. But I need to be in a place where I don't have so many pressing and pending projects as I do right now. That time will come!
ReplyDeletelouis vuitton handbags
ReplyDeletelouis vuitton outlet store
michael kors wallet sale
tiffany and co
ralph lauren polo
cheap ray ban sunglasses
cheap nfl jersey
replica handbags,replica handbags outlet,cheap handbags,purses and handbags,wholesale replica handbags,replica bags,bags outlet,replica handbags wholesale,cheap purses,discount handbags,handbags sale,wholesale purses,handbags and purses,replica purses
louis vuitton,borse louis vuitton,louis vuitton sito ufficiale,louis vuitton outlet
rolex watches,rolex watches,swiss watches,watches for men,watches for women,omega watches,replica watches,rolex watches for sale,rolex replica,rolex watch,cartier watches,rolex submariner,fake rolex,rolex replica watches,replica rolex
the north face outlet
tiffany and co
ed hardy clothing
new balance shoes
tiffany outlet
air jordan 13
ghd uk
uggs outlet
lacoste pas cher
fitflops clearance
0115minko
ninest123 16.03
ReplyDeletelongchamp outlet, uggs on sale, uggs on sale, uggs outlet, oakley sunglasses, louboutin uk, nike air max, louis vuitton outlet, michael kors outlet, louis vuitton handbags, nike free, tiffany jewelry, michael kors outlet online, tiffany jewelry, michael kors outlet online, replica watches, oakley sunglasses, oakley sunglasses, ray ban sunglasses, cheap jordans, nike air max, louis vuitton outlet online, oakley sunglasses, burberry outlet, ralph lauren outlet, christian louboutin, uggs outlet, michael kors, burberry factory outlet, ralph lauren polo, christian louboutin, ray ban sunglasses, michael kors handbags, gucci handbags, replica watches, longchamp outlet, prada outlet, tory burch outlet, louis vuitton outlet, cheap oakley sunglasses, uggs on sale, louboutin shoes, prada handbags, longchamp bags, nike outlet, louis vuitton, michael kors outlet online, ray ban sunglasses
michael kors outlet online, polo ralph lauren uk, ralph lauren pas cher, nike air max, michael kors uk, hermes pas cher, true religion outlet, true religion jeans, polo lacoste pas cher, coach purses, coach outlet store online, north face pas cher, lululemon outlet, true religion outlet, lunette ray ban pas cher, hogan sito ufficiale, nike blazer pas cher, nike roshe uk, michael kors, timberland pas cher, nike air max pas cher, true religion outlet, burberry pas cher, nike roshe run pas cher, lunette oakley pas cher, nike tn pas cher, nike air max uk, abercrombie and fitch, nike air force, new balance, jordan pas cher, replica handbags, north face uk, ray ban uk, michael kors, nike air max uk, sac guess pas cher, converse, hollister uk, vans pas cher, louboutin pas cher, longchamp soldes, longchamp pas cher, nike free pas cher, mulberry uk, coach outlet, nike free, vanessa bruno pas cher, abercrombie and fitch UK
ReplyDeletepandora charms, moncler jackets, toms shoes, swarovski uk, moncler uk, barbour, replica watches, canada goose, marc jacobs, links of london uk, supra shoes, louis vuitton uk, converse shoes outlet, moncler outlet, swarovski jewelry, canada goose outlet, coach outlet, moncler pas cher, ugg pas cher, thomas sabo uk, canada goose outlet, louis vuitton, sac louis vuitton, moncler, barbour jackets uk, juicy couture outlet, pandora jewelry, montre pas cher, canada goose jackets, ugg,uggs,uggs canada, moncler, canada goose jackets, louis vuitton, ray ban, hollister, ugg,ugg australia,ugg italia, canada goose uk, bottes ugg pas cher, moncler, juicy couture outlet, canada goose pas cher, sac louis vuitton, lancel, pandora jewelry, moncler, ugg uk, wedding dresses uk, karen millen uk, pandora uk, canada goose, gucci
ReplyDeleteninest123 16.03