
I finally have a new pillow to share, hooray! Although it took me about a week to finish completely, taking a few minutes of extra sewing time here and there, this pillow is truly a super quick make! Along with these photos today I'll be including the details for those of you who'd like to make your own!
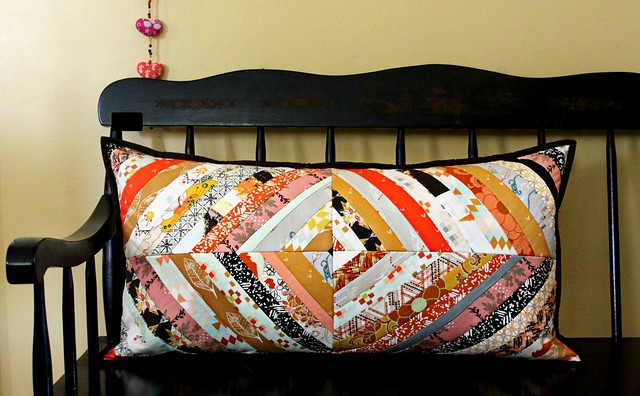
As I shared last week, this is simply a fun pillow version of my Herringbone QAYG tutorial. To fit the long 14" x 28" pillow insert that I purchased for this project, I started by making four quilt-as-you-go blocks that each measure 7.5" x 14.5."

Once my fabric strips were sewn to all four qayg rectangles, I squared them up, and sewed them together to create my finished pillow top. I chose to leave mine simple, but added hand or decorative stitches would be really lovely here!
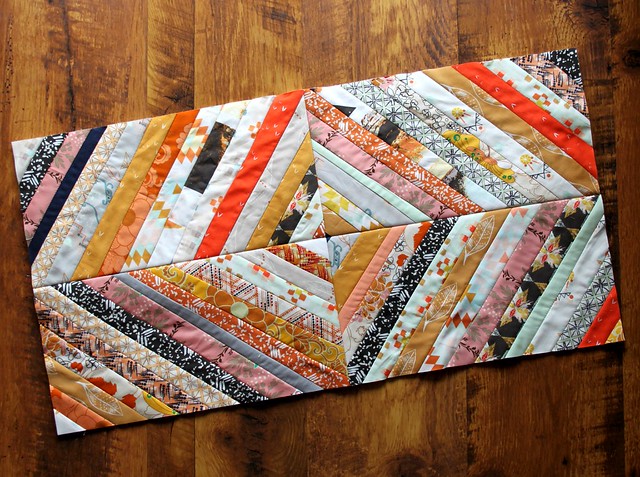
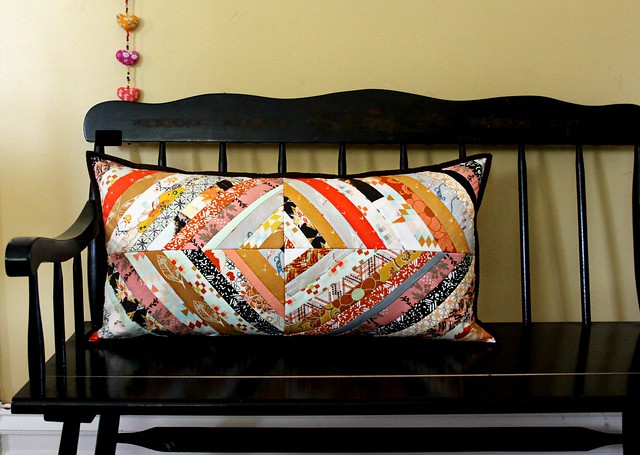
You can see below that this is the exact same method I use to create my Diamond String QAYG quilts, using just slightly different measurements for my rectangle blocks. One of the many reasons I love this pattern so much is because you can get so creative, using any size block you'd like, rectangle or square for this style of pillow or quilt. For a quilt, just continue making blocks until you have the desired size, sew them together when finished, and attach the quilt back by sewing 1/4" to 1/2" from each vertical and horizontal seam. So easy and a beautiful end result!
To finish my pillow I quilted up a large piece of this Indie print with an Auriful 40wt in a sweet pink shade. Once quilted, I cut it into two pieces measuring 14.5" x about 16.5" for an envelope style back, and bound each unfinished edge with some leftover bright orange Tule fabric binding!
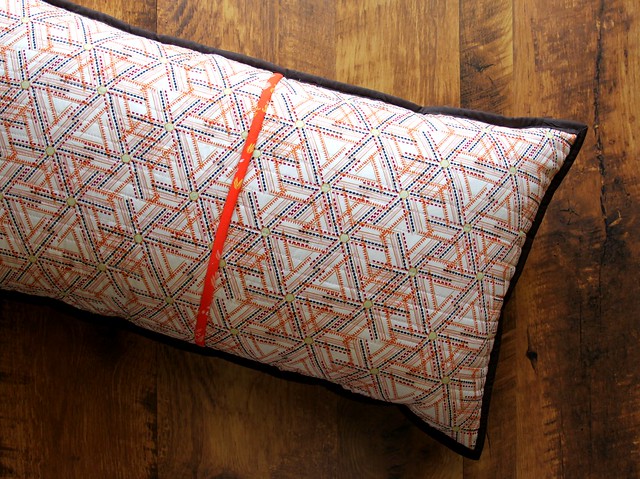
Next I made and added my pillow binding in this rich chocolate brown Pure Elements solid. To create enough binding for this size pillow you'll need just 3 strips, 2.5" x wof. Brown isn't a popular choice very often, but I personally have always loved the combination of brown with pink so, when I auditioned all the binding options yesterday, the brown won out and I'm really happy with how it turned out! This pillow will live on our bed after all, and I think a little added masculinity is a nice contrast to all the flowery sheets, quilts, and duvets that dress our bed throughout the year!

Be sure to let me know if you give this pillow design a try! I plan to make many more myself! ♡ Maureen
As I shared last week, this is simply a fun pillow version of my Herringbone QAYG tutorial. To fit the long 14" x 28" pillow insert that I purchased for this project, I started by making four quilt-as-you-go blocks that each measure 7.5" x 14.5."
Once my fabric strips were sewn to all four qayg rectangles, I squared them up, and sewed them together to create my finished pillow top. I chose to leave mine simple, but added hand or decorative stitches would be really lovely here!
You can see below that this is the exact same method I use to create my Diamond String QAYG quilts, using just slightly different measurements for my rectangle blocks. One of the many reasons I love this pattern so much is because you can get so creative, using any size block you'd like, rectangle or square for this style of pillow or quilt. For a quilt, just continue making blocks until you have the desired size, sew them together when finished, and attach the quilt back by sewing 1/4" to 1/2" from each vertical and horizontal seam. So easy and a beautiful end result!
To finish my pillow I quilted up a large piece of this Indie print with an Auriful 40wt in a sweet pink shade. Once quilted, I cut it into two pieces measuring 14.5" x about 16.5" for an envelope style back, and bound each unfinished edge with some leftover bright orange Tule fabric binding!
Next I made and added my pillow binding in this rich chocolate brown Pure Elements solid. To create enough binding for this size pillow you'll need just 3 strips, 2.5" x wof. Brown isn't a popular choice very often, but I personally have always loved the combination of brown with pink so, when I auditioned all the binding options yesterday, the brown won out and I'm really happy with how it turned out! This pillow will live on our bed after all, and I think a little added masculinity is a nice contrast to all the flowery sheets, quilts, and duvets that dress our bed throughout the year!
Be sure to let me know if you give this pillow design a try! I plan to make many more myself! ♡ Maureen
Perfect choice on the binding. It is so striking. My favorite part of the pillow.
ReplyDeleteI totally want to make one! Yours is stunning!
ReplyDeleteWow,just fantastic!
ReplyDeleteThanks for sharing your pillow. It is such a great size and the colours are amazing.
ReplyDeleteI plan to make one soon.
this is very pretty. should dress up your bedroom nicely
ReplyDeleteReally like your choice of backing, Maureen, and the added orange binding across the opening. Very pretty!! Susie
ReplyDeleteThat is a great pillow. Like the size and of course the colors are amazing!
ReplyDeleteLove the pillow and appreciate the tutorial. I am making a string quilt as a donation quilt right now and this would be a nice addition.
ReplyDeleteBeautiful!
ReplyDeleteThis is too wonderful to be real! You did a great piece of art - I really admire that. Best regards1
ReplyDeleteI also love pink and brown together and love how your pillow turned out!! Thanks for the tutorial…I'll definitely be making one (or more) of these :)
ReplyDeletecwayons(at)yahoo(dot)com
Looks like a very huggable pillow!
ReplyDeletewhere did you purchase a pillow insert this size? it looks fantastic!
ReplyDeleteThe longer pillow form really accentuates the design! I like this very much and I still want to try your quilt as you go method!
ReplyDeleteLove the pillow. Thanks for sharing it and how you made it
ReplyDeleteAfter reading your article, I am very excited, very lucky to meet you, hope you can as soon as possible from the next works! Come on.
ReplyDeleteThis comment has been removed by a blog administrator.
ReplyDeleteThat pillow is so lovely! I think combining different fabric strips to create its pattern is a brilliant idea. Not only it turned out nice, but it’s a good way to not let excess fabrics go to waste. Talk about resourcefulness, eh? Thanks for sharing, Maureen!
ReplyDeleteMelissa Robinson @ Pillow Perfect
1595meiqing
ReplyDeleteray bans
christian louboutin outlet
michael kors handbags
longchamp bags
abercrombie and fitch new york
air jordan 13
michael kors outlet online
timberland uk
true religion
ray ban sunglass
nfl jerseys
fake oakley sunglasses
burberry outlet
ray ban sunglasses uk
louboutin pas cher
coach factory outlet
michael kors
ray ban sunglasses
tory burch outlet online
toms shoes
louis vuitton
pandora charms
ralph lauren
michael kors outlet
toms outlet
michael kors outlet online
cheap jerseys
polo ralph lauren
nike free runs
football shoes
chenlina20151120
ReplyDeleteed hardy clothing
gucci shoes
cheap jordans
coach outlet
true religion outlet
michael kors outlet
christian louboutin outlet
cheap air jordans
air force 1
supra shoes
coach outlet store online
canada goose jackets
ray ban outlet
michael kors bag
ray ban sunglasses outlet
michael kors outlet
michael kors handbags
gucci handbags
running shoes
uggs outlet
louis vuitton
oakley sunglasses cheap
uggs outlet
coach factory outlet online
michael kors outlet
louis vuitton outlet
north face outlet
louis vuitton outlet
nike huarache shoes
lebron 11
instyler max
air max uk
uggs for men
cheap nfl jerseys
canada goose coats
hermes birkin
coach factory outlet
oakley sunglasses
toms wedges
michael kors uk
as
jianbin1203
ReplyDeletecheap uggs
north face outlet online
coach outlet online
uggs outlet
snapback hats
true religion outlet,true religion jeans,true religion kids,true religion jeans sale,true religion jeans for men,true religion jacket,true religion sale
cheap oakley sunglasses
moncler coats
ugg boots on sale
cyber monday
kobe bryants shoes 2015
polo ralph lauren uk
moncler outlet
lululemon outlet
prada outlet
chanel handbags
ugg uk outlet
toms outlet
canada goose outlet
the north face jackets
new england patriots
chicago blackhawks
michael kors outlet sale
new york giants
air force one shoes
nike air max 90
ugg boots
air jordan 11 free shipping
michael kors handbags
nike trainers uk
air jordan shoes
kansas city chiefs
michael kors outlet
ReplyDeletemichael kors
2015 michael kors outlet
michael kors outlet stores
michael kors outlet online
michael kors outlet online
michael kors sale
Michael Kors Wallet
michael kors handbags
michael kors handbags
michael kors tote
michael kors bags
macys michael kors
michael kors uk
michael kors factory
michael kors outlets
michael kors outlet online store 49.00 outlet
Michael Kors Flagship Store
Cheap Michael Kors Bags
Michael Kors Drawstring Bags
Michael Kors Rings
Michael Kors Jewelry
Michael Kors Crossbody
Michael Kors Totes
Great article and right to the point. I don’t know if this is in fact the best place to ask but do you people have any ideea where to employ some professional writers? Thank you
ReplyDeletechristian louboutin uk
ReplyDeletekobe 11
sac longchamp
coach factory outlet online
longchamp outlet store
fitflop uk
coach factory outlet online
nike free flyknit 3.0
michael kors uk
nike roshe run women
michael kors outlet clearance
moncler outlet online
jordans shoes
adidas stan smith
north face outlet
louboutin shoes
ghd flat iron
kate spade outlet
ugg australia outlet
ralph lauren uk
michael kors outlet online
hermes uk
christian louboutin shoes
cheap jordans
tiffany and co outlet
ray ban sunglasses
polo ralph lauren outlet online
adidas nmd
new balance outlet
louis vuitton borse
hermes belt
rolex watches uk
2016721yuanyuan
Great article. I will share useful fabrics collections links.'
ReplyDeleteWholesale material fabrics
material for curtains and upholstery fabrics
roller blinds for offices and home
window curtain rods